Butt Sealing is the process of joining two sections of glass tubing together - end to end. This exercise demonstrates the joining of two similar size tubes together. A variation of this seal would be the joining of two different diameter tubes as discussed in the
T seal section of this tutorial. Two butt seal options are offered here. The first requires good rotational skills.
Option #1 - Rotation Method
- Cut two pieces of tubing into 8" - 12" lengths and fire polish the ends.
- Attach your blowhose assembly to one tube.
- Seal the second tube with a cork or use a test tube bottom from the previous lesson.
- Light your torch and adjust the flame.
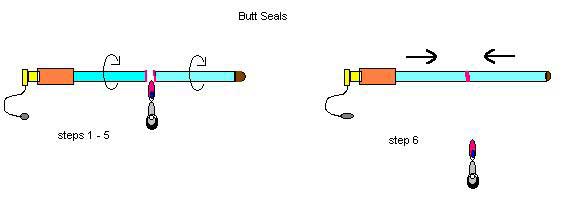
- Rotate both ends of the glass tubing (as if fire polishing) in the flame. They should be close, but not yet touching.
- When the tube ends are red hot, remove both from the flame, stop rotating, and push the tubes together, making contact all around. If the tubes are not well aligned, you may need to start over.

- Place the sealed area back in the flame, concentrated directly on the seal, and then rotate and blow, maintaining ID and OD, to work the initial seam/line into one continuous piece of glass.
- Anneal. Remember, a glassblowing job is never complete until the glassware is annealed!
- Check your work - roll the final piece on a flat surface and ensure there is no wobble and that no section of the joined tubes ever leaves the ground.
 | Tip: Upon reaching Step 6 (pushing or "butting" the tubes together making a seal), some glassblowers will pull the tubes slightly apart immediately after butting them together. The reasoning is that when the tubes are butted together there will be a thickening of the glass wall at the point of contact. By slightly pulling the tubes apart the glass walls will come back to their original thickness, making it easier to work out the seal. Do not pull too hard, however. You want to avoid creating a thin spot or section in the tube, producing a potentially weak seal. |
Option #2 - Stationary Method
This option does not require rotation. It does require the glassblower to hold and manipulate the torch around a glass tube that is held stationary in a standard laboratory ring stand:

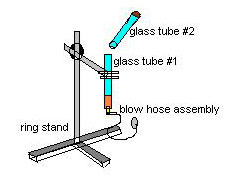
- Clamp tube #1 vertically in a ring stand. The end of the tube should be about chin high. Attach the blow hose to the bottom of the piece.
- Adjust the torch to a sharp flame and hold it one hand. Hold tube #2 in your other hand. Tube #2 should be sealed or stoppered.
- Sweep the flame back and forth across the end of tube #1, concentrating on the back half of the tube.
- At the same time, hold tube #2 above tube #1 at a slight angle and heat it simultaneously as in step 3.
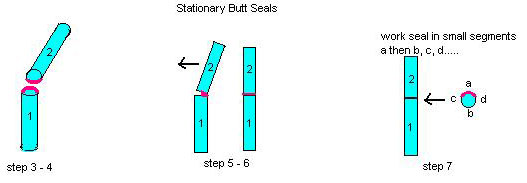
- Bring tube #2 down, contacting the back of tube #1 first, and continue to sweep the flame back and forth across the tube ends.
- Continue to bring tube #2 down onto tube #1, making complete contact around the circumference. With practice, steps 5 and 6 are completed in a quick, smooth, continuous motion. If the tubes are not well aligned, you may need to start over.
- Using a small sharp flame, work out the seal by heating small sections of the seal at a time.
- Anneal. Remember, a glassblowing job is never complete until the glassware is annealed!
- Check your work - roll the final piece on a flat surface and ensure there is no wobble and that no section of the joined tubes ever leaves the ground.

 | Tip: Heating large areas of of glass using this technique may give you control problems at step #6. Concentrating your heat on approximately 20% of the tube diameter at a time should give you the best results. |


