 |
 Safety Emporium is a proud sponsor of this site. |
 |
Home Page --> Tutorial Lesson 10, Making a Test Tube
|
 |
 Safety Emporium is a proud sponsor of this site. |
 |
Home Page --> Tutorial Lesson 10, Making a Test Tube
|
| Tutorial Lesson 10, Making a Test Tube | |
|---|---|
| Lesson 9 (Annealing) |
Lesson 11 (Butt Seals) |

| Tip: Roll the glass point (after cooling) on a flat surface. If your rotation is good the glass tube and "point" will be centered with no wobble. |

| Tip: This is a good time to practice the process of blowing glass. Try different flame and blow pressure combinations to see how the glass responds. Position the glass tube in different regions or angles of the flame. Glassblowers will use combinations of heat, flame size and angle, gravity and pressure in shaping glass. With experience you will learn how much or hard to blow air, when to let gravity work for you, and even when to inhale to produce that certain look or shape. |

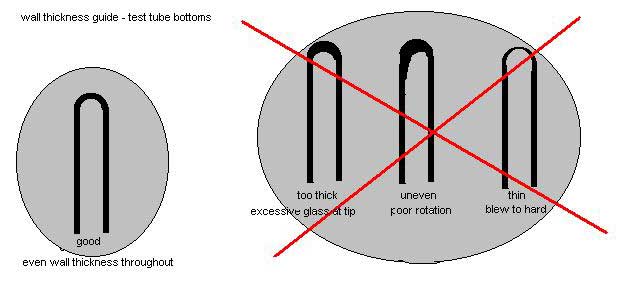
In virtually all cases you should strive to maintain an even wall thickness throughout your glass project. If the glass tube is not rotated or heated evenly the glass wall may become lopsided, thick on one side and thin on the other. It will be difficult to control the glass being worked if the difference in wall thickness is too great. The uneven wall thickness will not heat to the working temperature uniformly, resulting in hot spots (thin wall) that blow out and cold spots (heavy wall) that do not move. Even wall thickness will help you produce structurally sound glass apparatus.
The importance of good rotation should now be apparent!
| Tutorial Lesson 10, Making a Test Tube | |
|---|---|
| Lesson 9 (Annealing) |
Lesson 11 (Butt Seals) |
This page and any associated material is copyright 2002-2025 by Joe Walas and/or ILPI unless otherwise stated. Unauthorized duplication or posting on other web sites is expressly prohibited. Send suggestions and comments (include the URL if applicable) to us by email. CAUTION: Be sure to read this important safety/legal disclaimer regarding the information on this page.