 |
 Safety Emporium is a proud sponsor of this site. |
 |
Home Page --> Tutorial Lesson 16, Ring Seals (Advanced Topic)
|
 |
 Safety Emporium is a proud sponsor of this site. |
 |
Home Page --> Tutorial Lesson 16, Ring Seals (Advanced Topic)
|
| Tutorial Lesson 16, Ring Seals (Advanced Topic) | |
|---|---|
| Lesson 15 (Repairs) |
Lesson 17 (Silvering - Advanced Topic) |
A. Select a piece of glass tubing approximately 12 inches long for the insert.

B. Use a sharp flame held in a stationary position. Rotate the glass tubing, concentrating the heat evenly in a very narrow band on the tubing. As color appears, push the tubing together, always rotating, forming a ring (maria). Hand anneal.
C. The ring diameter and thickness will vary depending on the amount of glass heated and by the amount of glass pushed together. The ring should be solid glass (no air line or pocket) at least twice the wall thickness of the glass tubing used.

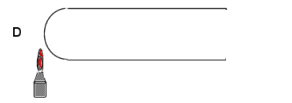
D. Select a glass tube to receive the insert and form a good test tube bottom. The wall thickness of this bottom should be slightly thicker than the normal wall thickness of the tubing and, very importantly, consistent.

E. Blow a "bubble" at the end of the tube using at least two steps. This will build up the wall thickness close to the glass body. Pop the bubble at the end and burn back the glass approximately halfway.

F. What you are attempting to make is a socket or cup that will contain the ring you've made earlier. The cup should extend just beyond the ring.

G. This step may be one of the most difficult in all glassblowing seals. Rotate both tubes evenly, pushing the smaller ring tube slightly into the cup. The flame should be relatively small and sharp, focused directly on the ring. Keep the flame splash directed towards the main body. If the smaller diameter glass tube receives too much heat the sealing process will become difficult to control. Work the outer glass cup into and around the ring. The finished seal should be well formed and smooth with no sharp or uneven edges. Anneal well.
The guidelines given here are simplified for clarity. Perhaps the most common cause of ring seal cracks for the beginning glassblower is in the failure to work out the seal properly. It is essential to get the glass pieces hot enough to flow well, creating a "seamless" seal.
There are a number of tricks that glassblowers use in making ring seals depending upon their skill level, size of tubing used and/or application. These tricks may include the use of temporary internal supports to help stabilize the inner tube. If your rotational skills are not well-developed, you have an alternative. Steps A - F are the same, but step G takes place in the ring stand. The large tube is mounted vertically and held stationary in the clamp and the smaller ringed "floats" in the cup. Move the torch flame around the ring in a similar fashion to making T seals. You will probably have to use a tungsten pick or graphite rod to help in making the initial stick.